fdisk 管理磁盘分区
一块硬盘可以被划分成一个或多个逻辑磁盘,我们将其称作分区。我们对硬盘进行的划分信息被储存于建立在扇区 0 的分区表(MBR 或 GPT)中。
Linux 需要至少一个分区来当作根文件系统,所以我们不能在没有分区的情况下安装 Linux 系统。当我们创建一个分区时,我们必须将它格式化为一个适合的文件系统,否则我们就没办法往里面储存文件了。
要在 Linux 中完成分区的相关工作,我们需要一些工具。Linux 下有很多可用的相关工具,今天我们的主角是 fdisk。
人人都喜欢用 fdisk,它是 Linux 下管理磁盘分区的最佳利器之一。它可以操作最大 2TB 的分区。大量 Linux 管理员都喜欢使用这个工具,因为当下 LVM 和 SAN 的原因,并没有多少人会用到 2TB 以上的分区。并且这个工具被世界上许多的基础设施所使用。如果你还是想创建比 2TB 更大的分区,请使用 parted 命令 或 cfdisk 命令。
对磁盘进行分区和创建文件系统是 Linux 管理员的日常。如果你在许多不同的环境中工作,你一定每天都会重复几次这项操作。
什么是 fdisk 命令?
fdisk 的意思是固定磁盘 Fixed Disk 或格式化磁盘 Format Disk,它是命令行下允许用户对分区进行查看、创建、调整大小、删除、移动和复制的工具。它支持 MBR、Sun、SGI、BSD 分区表,但是它不支持 GUID 分区表(GPT)。请注意它不是为操作大分区而设计的(最大可操作 2TB 的分区)。
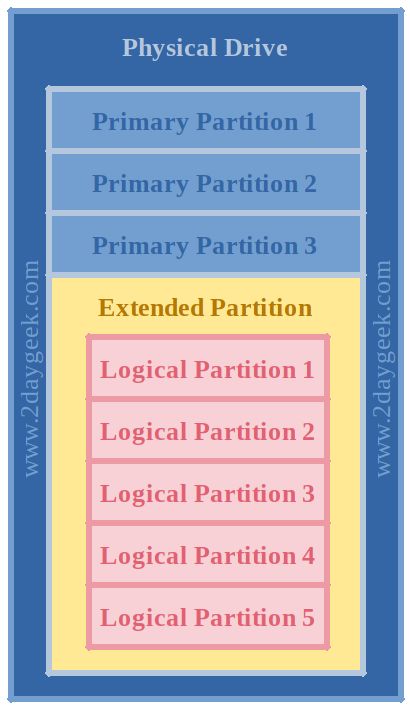
fdisk 允许我们在每块硬盘上创建最多四个主分区。它们中的其中一个可以作为扩展分区,并下设多个逻辑分区。1-4 扇区作为主分区被保留,逻辑分区从扇区 5 开始。
在 fdisk 中敲击 m,便会列出所有的可用操作,:
$ sudo fdisk /dev/sdc
Welcome to fdisk (util-linux 2.30.1).
Changes will remain in memory only, until you decide to write them.
Be careful before using the write command.
Device does not contain a recognized partition table.
Created a new DOS disklabel with disk identifier 0xe944b373.
Command (m for help): m
Help:
  DOS (MBR)
   a   toggle a bootable flag
   b   edit nested BSD disklabel
   c   toggle the dos compatibility flag
  Generic
   d   delete a partition
   F   list free unpartitioned space
   l   list known partition types
   n   add a new partition
   p   print the partition table
   t   change a partition type
   v   verify the partition table
   i   print information about a partition
  Misc
   m   print this menu
   u   change display/entry units
   x   extra functionality (experts only)
  Script
   I   load disk layout from sfdisk script file
   O   dump disk layout to sfdisk script file
  Save & Exit
   w   write table to disk and exit
   q   quit without saving changes
  Create a new label
   g   create a new empty GPT partition table
   G   create a new empty SGI (IRIX) partition table
   o   create a new empty DOS partition table
   s   create a new empty Sun partition table
列出可用磁盘
$ sudo fdisk -l
Disk /dev/sda: 30 GiB, 32212254720 bytes, 62914560 sectors
Units: sectors of 1 * 512 = 512 bytes
Sector size (logical/physical): 512 bytes / 512 bytes
I/O size (minimum/optimal): 512 bytes / 512 bytes
Disklabel type: dos
Disk identifier: 0xeab59449
Device     Boot    Start      End  Sectors Size Id Type
/dev/sda1  *    20973568 62914559 41940992  20G 83 Linux
Disk /dev/sdb: 10 GiB, 10737418240 bytes, 20971520 sectors
Units: sectors of 1 * 512 = 512 bytes
Sector size (logical/physical): 512 bytes / 512 bytes
I/O size (minimum/optimal): 512 bytes / 512 bytes
Disk /dev/sdc: 10 GiB, 10737418240 bytes, 20971520 sectors
Units: sectors of 1 * 512 = 512 bytes
Sector size (logical/physical): 512 bytes / 512 bytes
I/O size (minimum/optimal): 512 bytes / 512 bytes
Disk /dev/sdd: 10 GiB, 10737418240 bytes, 20971520 sectors
Units: sectors of 1 * 512 = 512 bytes
Sector size (logical/physical): 512 bytes / 512 bytes
I/O size (minimum/optimal): 512 bytes / 512 bytes
Disk /dev/sde: 10 GiB, 10737418240 bytes, 20971520 sectors
Units: sectors of 1 * 512 = 512 bytes
Sector size (logical/physical): 512 bytes / 512 bytes
I/O size (minimum/optimal): 512 bytes / 512 bytes

# 列出指定分区的信息:
$ sudo fdisk -l /dev/sda
Disk /dev/sda: 30 GiB, 32212254720 bytes, 62914560 sectors
Units: sectors of 1 * 512 = 512 bytes
Sector size (logical/physical): 512 bytes / 512 bytes
I/O size (minimum/optimal): 512 bytes / 512 bytes
Disklabel type: dos
Disk identifier: 0xeab59449
Device     Boot    Start      End  Sectors Size Id Type
/dev/sda1  *    20973568 62914559 41940992  20G 83 Linux
列出分区类型
$ sudo fdisk /dev/sdc
Welcome to fdisk (util-linux 2.30.1).
Changes will remain in memory only, until you decide to write them.
Be careful before using the write command.
Device does not contain a recognized partition table.
Created a new DOS disklabel with disk identifier 0x9ffd00db.

Command (m for help): l
 0  Empty           24  NEC DOS         81  Minix / old Lin bf  Solaris
 1  FAT12           27  Hidden NTFS Win 82  Linux swap / So c1  DRDOS/sec (FAT-
 2  XENIX root      39  Plan 9          83  Linux           c4  DRDOS/sec (FAT-
 3  XENIX usr       3c  PartitionMagic  84  OS/2 hidden or  c6  DRDOS/sec (FAT-
 4  FAT16 <32M      40  Venix 80286     85  Linux extended  c7  Syrinx
 5  Extended        41  PPC PReP Boot   86  NTFS volume set da  Non-FS data
 6  FAT16           42  SFS             87  NTFS volume set db  CP/M / CTOS / .
 7  HPFS/NTFS/exFAT 4d  QNX4.x          88  Linux plaintext de  Dell Utility
 8  AIX             4e  QNX4.x 2nd part 8e  Linux LVM       df  BootIt
 9  AIX bootable    4f  QNX4.x 3rd part 93  Amoeba          e1  DOS access
 a  OS/2 Boot Manag 50  OnTrack DM      94  Amoeba BBT      e3  DOS R/O
 b  W95 FAT32       51  OnTrack DM6 Aux 9f  BSD/OS          e4  SpeedStor
 c  W95 FAT32 (LBA) 52  CP/M            a0  IBM Thinkpad hi ea  Rufus alignment
 e  W95 FAT16 (LBA) 53  OnTrack DM6 Aux a5  FreeBSD         eb  BeOS fs
 f  W95 Ext'd (LBA) 54  OnTrackDM6      a6  OpenBSD         ee  GPT
10  OPUS            55  EZ-Drive        a7  NeXTSTEP        ef  EFI (FAT-12/16/
11  Hidden FAT12    56  Golden Bow      a8  Darwin UFS      f0  Linux/PA-RISC b
12  Compaq diagnost 5c  Priam Edisk     a9  NetBSD          f1  SpeedStor
14  Hidden FAT16 <3 61  SpeedStor       ab  Darwin boot     f4  SpeedStor
16  Hidden FAT16    63  GNU HURD or Sys af  HFS / HFS+      f2  DOS secondary
17  Hidden HPFS/NTF 64  Novell Netware  b7  BSDI fs         fb  VMware VMFS
18  AST SmartSleep  65  Novell Netware  b8  BSDI swap       fc  VMware VMKCORE
1b  Hidden W95 FAT3 70  DiskSecure Mult bb  Boot Wizard hid fd  Linux raid auto
1c  Hidden W95 FAT3 75  PC/IX           bc  Acronis FAT32 L fe  LANstep
1e  Hidden W95 FAT1 80  Old Minix       be  Solaris boot    ff  BBT
创建一个新的磁盘分区
如果你希望新建磁盘分区,请参考下面的步骤。比如我希望在 /dev/sdc 中新建四个分区(三个主分区和一个扩展分区),只需要执行下文的命令。
首先,请在操作 “First sector” 的时候先按下回车,然后在 “Last sector” 中输入你希望创建分区的大小(可以在数字后面加 KB、MB、G 和 TB)。例如,你希望为这个分区扩容 1GB,就应该在 “Last sector” 中输入 +1G。当你创建三个分区之后,fdisk 默认会将分区类型设为扩展分区,如果你希望创建第四个主分区,请输入 p 来替代它的默认值 e。
# 操作磁盘
$ sudo fdisk /dev/sdc
Welcome to fdisk (util-linux 2.30.1).
Changes will remain in memory only, until you decide to write them.
Be careful before using the write command.

# 新建分区
Command (m for help): n
Partition type
   p   primary (0 primary, 0 extended, 4 free)
   e   extended (container for logical partitions)

# 分区类型:p 主分区;e 扩展分区
Select (default p): Enter
Using default response p.
Partition number (1-4, default 1): Enter
First sector (2048-20971519, default 2048): Enter

# 分区大小
Last sector, +sectors or +size{K,M,G,T,P} (2048-20971519, default 20971519): +1G
Created a new partition 1 of type 'Linux' and of size 1 GiB.

Command (m for help): p
Disk /dev/sdc: 10 GiB, 10737418240 bytes, 20971520 sectors
Units: sectors of 1 * 512 = 512 bytes
Sector size (logical/physical): 512 bytes / 512 bytes
I/O size (minimum/optimal): 512 bytes / 512 bytes
Disklabel type: dos
Disk identifier: 0x8cc8f9e5
Device     Boot Start     End Sectors Size Id Type
/dev/sdc1        2048 2099199 2097152   1G 83 Linux

# 保存分区表
Command (m for help): w
The partition table has been altered.
Calling ioctl() to re-read partition table.
Syncing disks.
创建扩展分区和逻辑分区
请注意,创建扩展分区时,你应该使用剩下的所有空间,以便之后在扩展分区下创建逻辑分区。
创建扩展分区后,可以按照之前的步骤创建逻辑分区。在这里,我创建了位于 /dev/sdc5 的 1GB 逻辑分区。你可以查看分区表值来确认这点。
$ sudo fdisk /dev/sdc
Welcome to fdisk (util-linux 2.30.1).
Changes will remain in memory only, until you decide to write them.
Be careful before using the write command.
Command (m for help): n
Partition type
   p   primary (3 primary, 0 extended, 1 free)
   e   extended (container for logical partitions)

# 创建扩展分区
Select (default e): Enter
Using default response e.
Selected partition 4
First sector (6293504-20971519, default 6293504): Enter
Last sector, +sectors or +size{K,M,G,T,P} (6293504-20971519, default 20971519): Enter
Created a new partition 4 of type 'Extended' and of size 7 GiB.
Command (m for help): p
Disk /dev/sdc: 10 GiB, 10737418240 bytes, 20971520 sectors
Units: sectors of 1 * 512 = 512 bytes
Sector size (logical/physical): 512 bytes / 512 bytes
I/O size (minimum/optimal): 512 bytes / 512 bytes
Disklabel type: dos
Disk identifier: 0x8cc8f9e5
Device     Boot   Start      End  Sectors Size Id Type
/dev/sdc1          2048  2099199  2097152   1G 83 Linux
/dev/sdc2       2099200  4196351  2097152   1G 83 Linux
/dev/sdc3       4196352  6293503  2097152   1G 83 Linux
/dev/sdc4       6293504 20971519 14678016   7G  5 Extended

# 创建逻辑分区
Command (m for help): n
All primary partitions are in use.
Adding logical partition 5
First sector (6295552-20971519, default 6295552): Enter
Last sector, +sectors or +size{K,M,G,T,P} (6295552-20971519, default 20971519): +1G
Created a new partition 5 of type 'Linux' and of size 1 GiB.
Command (m for help): p
Disk /dev/sdc: 10 GiB, 10737418240 bytes, 20971520 sectors
Units: sectors of 1 * 512 = 512 bytes
Sector size (logical/physical): 512 bytes / 512 bytes
I/O size (minimum/optimal): 512 bytes / 512 bytes
Disklabel type: dos
Disk identifier: 0x8cc8f9e5
Device     Boot   Start      End  Sectors Size Id Type
/dev/sdc1          2048  2099199  2097152   1G 83 Linux
/dev/sdc2       2099200  4196351  2097152   1G 83 Linux
/dev/sdc3       4196352  6293503  2097152   1G 83 Linux
/dev/sdc4       6293504 20971519 14678016   7G  5 Extended
/dev/sdc5       6295552  8392703  2097152   1G 83 Linux
Command (m for help): w
The partition table has been altered.
Calling ioctl() to re-read partition table.
Syncing disks.
查看未分配空间
上文中,我们总共创建了四个分区(三个主分区和一个扩展分区)。在创建逻辑分区之前,扩展分区的容量将会以未分配空间显示。
使用以下命令来显示磁盘上的未分配空间,下面的示例中显示的是 7GB:
$ sudo fdisk /dev/sdc
Welcome to fdisk (util-linux 2.30.1).
Changes will remain in memory only, until you decide to write them.
Be careful before using the write command.

Command (m for help): F
Unpartitioned space /dev/sdc: 7 GiB, 7515144192 bytes, 14678016 sectors
Units: sectors of 1 * 512 = 512 bytes
Sector size (logical/physical): 512 bytes / 512 bytes
  Start      End  Sectors Size
6293504 20971519 14678016   7G
Command (m for help): q
删除分区
如果我们不再使用某个分区,请按照下面的步骤删除它。
请确保你输入了正确的分区号。在这里,我准备删除 /dev/sdc2 分区:
$ sudo fdisk /dev/sdc
Welcome to fdisk (util-linux 2.30.1).
Changes will remain in memory only, until you decide to write them.
Be careful before using the write command.
Command (m for help): d
Partition number (1-5, default 5): 2
Partition 2 has been deleted.
Command (m for help): p
Disk /dev/sdc: 10 GiB, 10737418240 bytes, 20971520 sectors
Units: sectors of 1 * 512 = 512 bytes
Sector size (logical/physical): 512 bytes / 512 bytes
I/O size (minimum/optimal): 512 bytes / 512 bytes
Disklabel type: dos
Disk identifier: 0x8cc8f9e5
Device     Boot   Start      End  Sectors Size Id Type
/dev/sdc1          2048  2099199  2097152   1G 83 Linux
/dev/sdc3       4196352  6293503  2097152   1G 83 Linux
/dev/sdc4       6293504 20971519 14678016   7G  5 Extended
/dev/sdc5       6295552  8392703  2097152   1G 83 Linux
Command (m for help): w
The partition table has been altered.
Calling ioctl() to re-read partition table.
Syncing disks.
分区需要格式化后才能使用
在计算时,文件系统控制了数据的储存方式,并通过 索引节点 Inode Tables 来检索数据。如果没有文件系统,操作系统是无法找到信息储存的位置的。简单来说,磁盘分区完成后必须格式化分区才可以使用,否则磁盘将无法存储数据。
在此,我准备在 /dev/sdc1 上创建分区。有三种方式创建文件系统:
$ sudo mkfs.ext4 /dev/sdc1
或
$ sudo mkfs -t ext4 /dev/sdc1
或
$ sudo mke2fs /dev/sdc1
mke2fs 1.43.5 (04-Aug-2017)
Creating filesystem with 262144 4k blocks and 65536 inodes
Filesystem UUID: c0a99b51-2b61-4f6a-b960-eb60915faab0
Superblock backups stored on blocks:
    32768, 98304, 163840, 229376
Allocating group tables: done
Writing inode tables: done
Creating journal (8192 blocks): done
Writing superblocks and filesystem accounting information: done
当你在分区上建立文件系统时,以下重要信息会同时被创建:
- Filesystem UUID: UUID 代表了通用且独一无二的识别符,UUID 在 Linux 中通常用来识别设备。它 128 位长的数字代表了 32 个十六进制数。
- Superblock: 超级块储存了文件系统的元数据。如果某个文件系统的超级块被破坏,我们就无法挂载它了(也就是说无法访问其中的文件了)。
- Inode: Inode 是类 Unix 系统中文件系统的数据结构,它储存了所有除名称以外的文件信息和数据。
- Journal: 日志式文件系统包含了用来修复电脑意外关机产生下错误信息的日志。
挂载分区
在创建完分区和文件系统之后,我们需要挂载它们以便使用。我们需要创建一个挂载点来挂载分区,使用 mkdir 来创建一个挂载点。
$ sudo mkdir -p /mnt/2g-new
进行临时挂载,请使用下面的命令。在计算机重启之后,你会丢失这个挂载点。
$ sudo mount /dev/sdc1 /mnt/2g-new
如果你希望永久挂载某个分区,请将分区详情加入 fstab 文件。我们既可以输入设备名称,也可以输入 UUID。
使用设备名称来进行永久挂载:
# vi /etc/fstab
/dev/sdc1 /mnt/2g-new ext4 defaults 0 0
使用 UUID 来进行永久挂载(请使用 blkid 来获取 UUID):
$ sudo blkid
/dev/sdc1: UUID="d17e3c31-e2c9-4f11-809c-94a549bc43b7" TYPE="ext2" PARTUUID="8cc8f9e5-01"
/dev/sda1: UUID="d92fa769-e00f-4fd7-b6ed-ecf7224af7fa" TYPE="ext4" PARTUUID="eab59449-01"
/dev/sdc3: UUID="ca307aa4-0866-49b1-8184-004025789e63" TYPE="ext4" PARTUUID="8cc8f9e5-03"
/dev/sdc5: PARTUUID="8cc8f9e5-05"
# vi /etc/fstab
UUID=d17e3c31-e2c9-4f11-809c-94a549bc43b7 /mnt/2g-new ext4 defaults 0 0
使用 df 命令亦可:
$ df -h
Filesystem      Size  Used Avail Use% Mounted on
udev            969M     0  969M   0% /dev
tmpfs           200M  7.0M  193M   4% /run
/dev/sda1        20G   16G  3.0G  85% /
tmpfs           997M     0  997M   0% /dev/shm
tmpfs           5.0M  4.0K  5.0M   1% /run/lock
tmpfs           997M     0  997M   0% /sys/fs/cgroup
tmpfs           200M   28K  200M   1% /run/user/121
tmpfs           200M   25M  176M  13% /run/user/1000
/dev/sdc1      1008M  1.3M  956M   1% /mnt/2g-new
最后简单总结一下,新磁盘的使用步骤:磁盘分区 > 格式化分区 > 挂在磁盘分区到系统中。